API enablement – Introduction to Pipelines and Kubeflow
We are enabling the APIs as and when it is required throughout various chapters. To work with vertex AI pipelines, we need to enable APIs in addition to the compute engine, container registry, aiplatform (which we have already enabled in previous chapters) like cloud functions, cloud build.
In the previous chapters we enabled the APIs through the user interface under APIs and services component of GCP. Let us see how we can enable multiple APIs in one go using cloud shell. The steps are as follows:
Step 1: Set the project
Follow the steps mentioned in Figure 6.2 to activate the cloud shell and set the project:
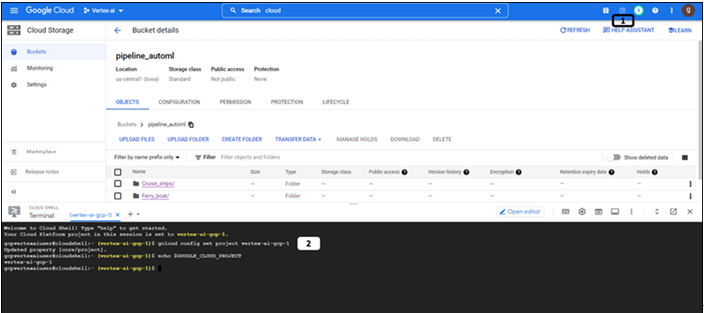
Figure 6.2: Activation of cloud shell and setting the project
- Click on activate cloud shell.
- Type the below commands:
a. To set the project – gcloud config set project vertex-ai-gcp-1
b. To check if the needed project is selected – echo $GOOGLE_CLOUD_PROJECT
Step 2: Enabling APIs
Follow the steps mentioned in Figure 6.3 to enable multiple APIs of GCP through cloud shell:
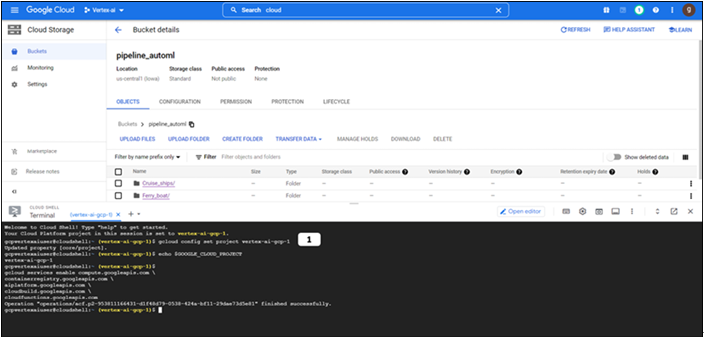
- Type the following commands to enable the APIs:
gcloud services enable compute.googleapis.com \
containerregistry.googleapis.com \
aiplatform.googleapis.com \
cloudbuild.googleapis.com \
cloudfunctions.googleapis.com
Status message will be shown once the APIs are enabled.
Additional permission for compute engine
In addition to the API enablement, we also need to grant additional permission to the service account associated with the compute engine of GCP as a storage admin to access the source files from the cloud storage (By default notebooks will have access for the cloud storage but in case of pipeline, code to fetch data, model training will not be executed on the notebook and hence the additional permission is needed. Notebook is used only to define the pipeline components and to execute the pipeline). Follow these steps to grant the permission:
Step 1: Open IAM and admin section
Follow the steps mentioned in Figure 6.4 to add roles to the service account associated with compute engine of GCP:
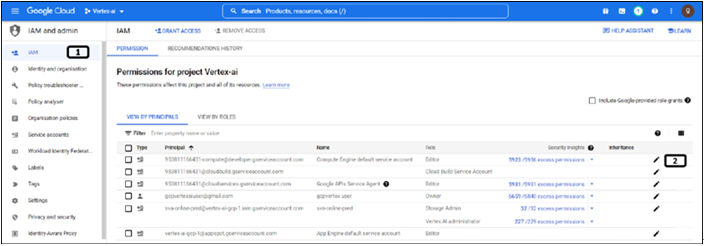
- Click IAM.
- Click Edit principal button.
Step 2: Additional role
Follow the steps mentioned in Figure 6.5, 6.6 and 6.7 to edit the roles of the service account of compute engine:
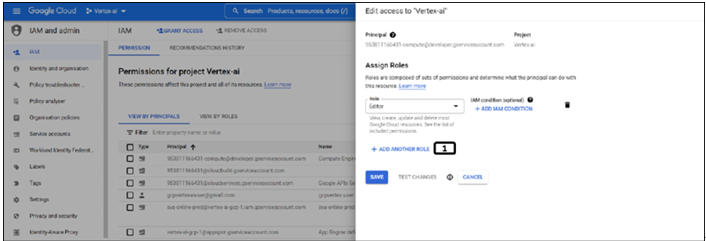
Figure 6.5: Edit roles of the service account
- Click ADD ANOTHER ROLE:
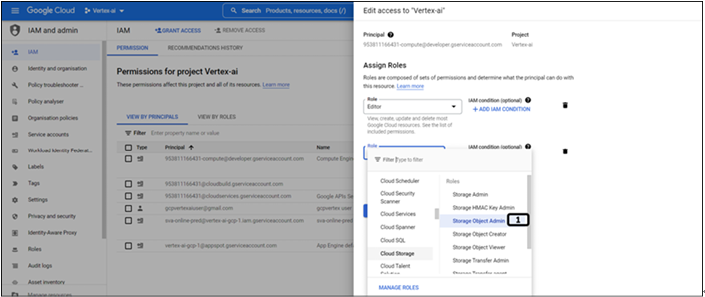
Figure 6.6: Adding storage object admin role
- Select Storage Object Admin role under the Cloud Storage filter.
- Click Save. A new role will be added to the service account as shown in Figure 6.7:

Figure 6.7: New role added to service account is visible in the IAM
- New role will be visible for the service account associated with the compute engine.
You may also like
Archives
- September 2024
- August 2024
- July 2024
- June 2024
- May 2024
- April 2024
- March 2024
- February 2024
- January 2024
- December 2023
- November 2023
- September 2023
- August 2023
- June 2023
- May 2023
- April 2023
- February 2023
- January 2023
- November 2022
- October 2022
- September 2022
- August 2022
- June 2022
- April 2022
- March 2022
- February 2022
- January 2022
- December 2021
- November 2021
- October 2021
Calendar
| M | T | W | T | F | S | S |
|---|---|---|---|---|---|---|
| 1 | 2 | |||||
| 3 | 4 | 5 | 6 | 7 | 8 | 9 |
| 10 | 11 | 12 | 13 | 14 | 15 | 16 |
| 17 | 18 | 19 | 20 | 21 | 22 | 23 |
| 24 | 25 | 26 | 27 | 28 | ||

Leave a Reply