Completion of custom model training job – Vertex AI Custom Model Hyperparameter and Deployment
Based on the complexity of the model, model training might take anywhere between a few minutes to a few hours. Once the model training is completed, it will be listed under the training section, as shown in the Figure 5.18:

Figure 5.18: Custom job listed under training module of Vertex AI
Training job will be listed under hyperparameter tuning jobs with the status (click on it).
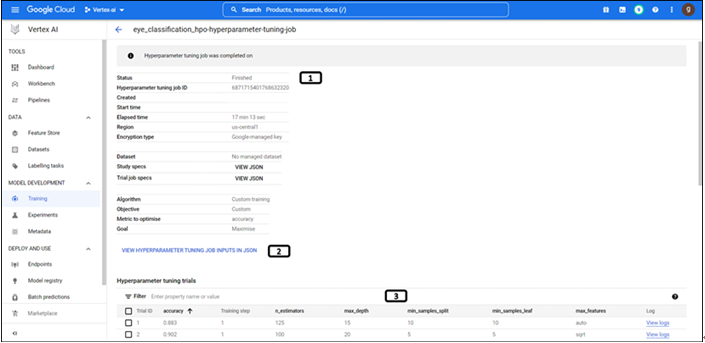
More details about the status, training logs will also be available, as shown in Figure 5.19:

Figure 5.19: Job details and log information of the training job
Follow the corresponding steps:
- Status of training, elapsed time and all other details are populated.
- Click on VIEW HYPERPARAMETER TUNING JOB INPUTS IN JSON, to view the hyperparameters and other details of the training job.
- Accuracy of various trails are populated in the section under Hyperparameter tuning trails, along with the detailed logs for each trail.
The trained model will be saved in the cloud storage bucket, as shown in Figure 5.20:

Figure 5.20: Model Trained model stored in cloud storage
- The trained model is exported as pkl file in cloud storage.
Often, custom trained models will not be listed in the model registry. Follow the given steps to import model to the model registry.
Step 1: Select model registry
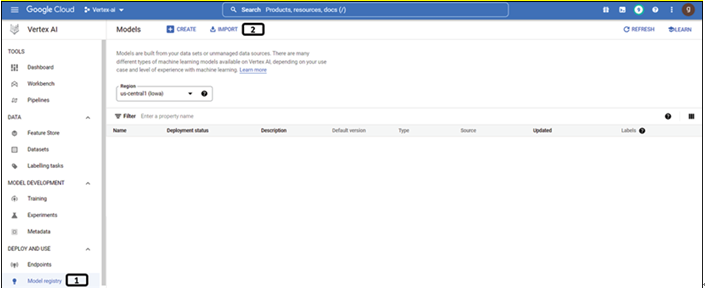
Select the model registry on vertex AI. Refer to Figure 5.21:

Figure 5.21: Model registry of Vertex AI
Follow the corresponding points:
- Select Model registry.
- Click IMPORT.
Step 2: Selection of name and region for the model
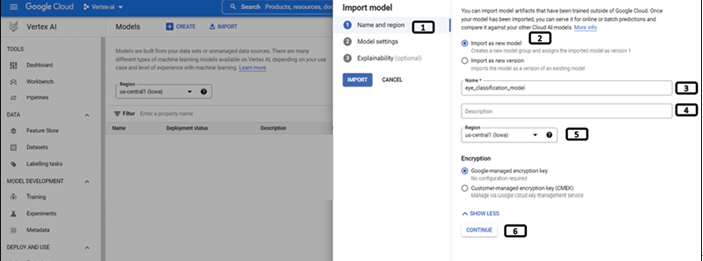
Refer to the Figure 5.22:

Figure 5.22: Name and region information for Importing trained model
Follow the corresponding points:
- Select Name and region.
- Select Import as new model.
- Provide Name for the model.
- Provide Description of the model.
- Select the Region to save the model.
- Click CONTINUE.
Step 3: Selection of model settings
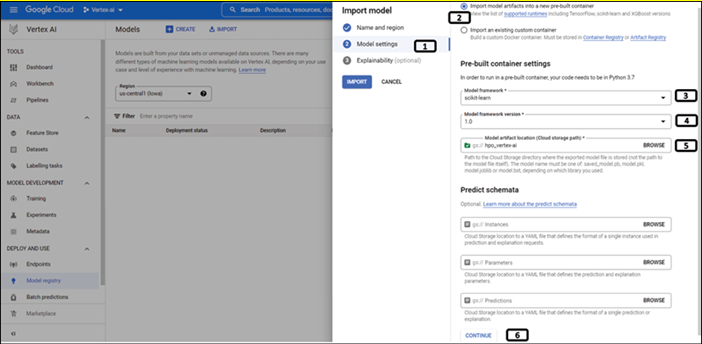
Refer to Figure 5.23:

Figure 5.23: Model settings for Importing trained model
Follow the corresponding points to configure the model to import:
- Select Model settings.
- Select Import model artifacts into a new pre-built container (Pre-build container can be used only for models trained using TensorFlow, sklearn and XGboost). If model is trained using any other packages, select the Import an existing custom container option.
- Select the framework on which model is trained.
- Select the version of the package (sklearn).
- Select the bucket which contains the exported model.
- Click on CONTINUE.
Step 4: Explain ability (optional)
Refer to the following Figure 5.24:

Figure 5.24: Setting explain ability of model
Follow the corresponding points to configure the model to import:
- Enabling Explainability of the model is optional; we will be ignoring it in this chapter.
- Click IMPORT.
Step 5: Model imported to model registry
The Imported model will be listed under model registry, as shown in the Figure 5.25:

Figure 5.25: Model imported successfully and listed under model registry
Follow the steps that has been described in the next section to deploy the model to endpoint and get online or batch predictions.
You may also like
Archives
- September 2024
- August 2024
- July 2024
- June 2024
- May 2024
- April 2024
- March 2024
- February 2024
- January 2024
- December 2023
- November 2023
- September 2023
- August 2023
- June 2023
- May 2023
- April 2023
- February 2023
- January 2023
- November 2022
- October 2022
- September 2022
- August 2022
- June 2022
- April 2022
- March 2022
- February 2022
- January 2022
- December 2021
- November 2021
- October 2021
Calendar
| M | T | W | T | F | S | S |
|---|---|---|---|---|---|---|
| 1 | 2 | |||||
| 3 | 4 | 5 | 6 | 7 | 8 | 9 |
| 10 | 11 | 12 | 13 | 14 | 15 | 16 |
| 17 | 18 | 19 | 20 | 21 | 22 | 23 |
| 24 | 25 | 26 | 27 | 28 | ||

Leave a Reply