Image creation – Vertex AI Custom Model Hyperparameter and Deployment-1
Now that we have completed the creation of the Dockerfile and python code for the model building, we can proceed with image creation. Follow the given steps for the same.
Step 1: Image creation using docker build
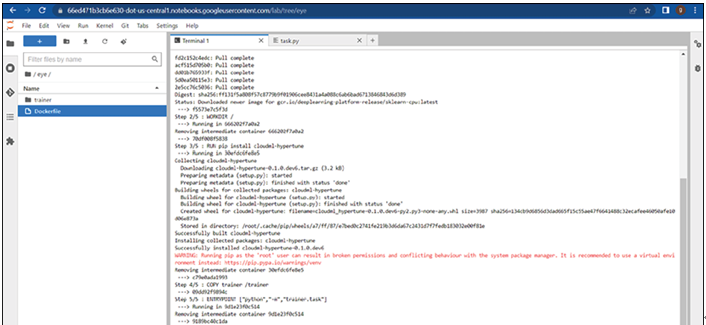
Type the following commands in the terminal, as shown in Figure 5.9, for image creation:
PROJECT_ID=vertex-ai-gcp-1
IMAGE_URL=”gcr.io/$PROJECT_ID/eye:v1”
docker build ./ -t $IMAGE_URL

Figure 5.9: Image creation process
It will take few mins to build the image from the Dockerfile. Once build is complete, a success message will be displayed in the terminal as shown in Figure 5.10. (point number 1).
Step 2: Pushing the docker image to the container registry
Now that the image is created (the success message for image creation can be seen in Figure 5.10), type the following command to push the image to the container registry:
docker push $IMAGE_URL
Refer to the following figure:

Figure 5.10: Image to project container registry
The image will be available in the container registry of the project (for checking, follow the steps described in the previous chapter).
Submitting the custom model training job
Steps for the custom model training with hyperparameter tuning are very similar to the ones described in the previous chapter, except that we will be enabling the hyperparameter tuning option. Follow the given steps to submit the training job.
Step 1: Training module of vertex AI
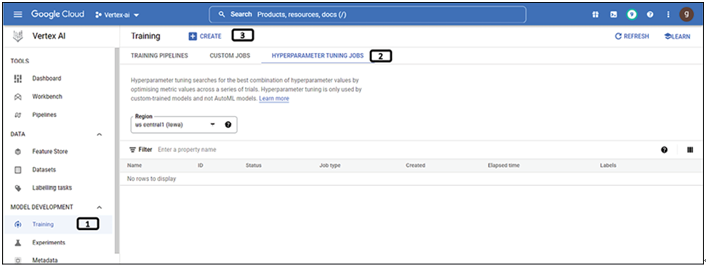
Open the training module of the vertex AI, as shown in Figure 5.11:

Figure 5.11: Training module of Vertex AI
- Select the Training module.
- Select HYPERPARAMETER TUNING JOBS.
- Click on CREATE.
Step 2: Selecting training method
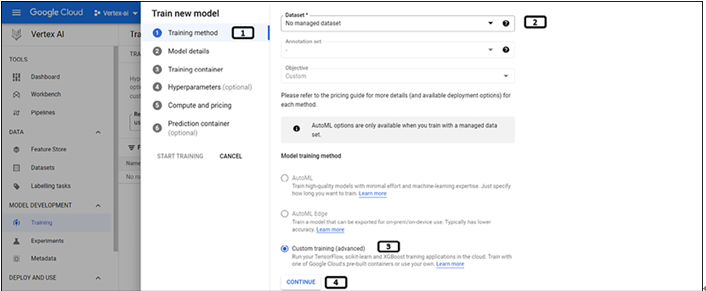
The Train new model page will appear, as shown Figure 5.12:

Figure 5.12: Training method selection for custom model
Follow the corresponding points to configure training method:
- Select the training method.
- Select No managed dataset under the Dataset selection.
- Select Custom Training.
- Click on Continue.
Step 3: Model details
Select the model details to train the model, as shown in the Figure 5.13:

Figure 5.13: Model details for custom model
Follow the corresponding points:
- After training method selection, we have to enter the Model details.
- Select Train new model.
- Provide a Name for the model.
- Select the Service account associated with the compute (users can also choose service account which we had created in Chapter 2, Introduction to Vertex AI and & AutoML Tabular, but roles to access cloud storage need to be added.)
- Scroll down and click on Continue.
Step 4: Training container details
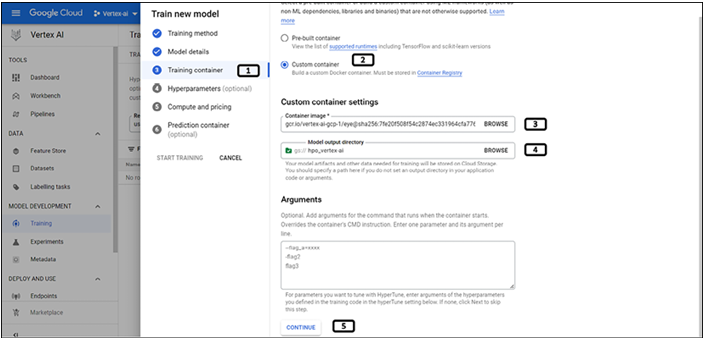
Follow the numbers and their corresponding points in Figure 5.14 to configure the training container:

Figure 5.14: Container details for custom model
Follow the corresponding points:
- After Dodel details selection, we have to enter the Training container details.
- Select Custom container.
- Browse for the Container image that has been pushed to container registry.
- Select the cloud storage bucket to store model artifacts (since we have already chosen bucket in the code, this can be left bank.)
- Click on Continue.
You may also like
Archives
- September 2024
- August 2024
- July 2024
- June 2024
- May 2024
- April 2024
- March 2024
- February 2024
- January 2024
- December 2023
- November 2023
- September 2023
- August 2023
- June 2023
- May 2023
- April 2023
- February 2023
- January 2023
- November 2022
- October 2022
- September 2022
- August 2022
- June 2022
- April 2022
- March 2022
- February 2022
- January 2022
- December 2021
- November 2021
- October 2021
Calendar
| M | T | W | T | F | S | S |
|---|---|---|---|---|---|---|
| 1 | 2 | |||||
| 3 | 4 | 5 | 6 | 7 | 8 | 9 |
| 10 | 11 | 12 | 13 | 14 | 15 | 16 |
| 17 | 18 | 19 | 20 | 21 | 22 | 23 |
| 24 | 25 | 26 | 27 | 28 | ||

Leave a Reply