Image creation – Vertex AI Workbench and Custom Model Training-2
Step 2: Selecting training method
Train new model page will appear as shown in Figure 4.27. Follow the steps mentioned in the figure to configure training method:

Figure 4.27: Training method selection for custom model
- Select the Training method.
- Select No managed dataset under the Dataset selection.
- Select custom training.
- Click CONTINUE.
Step 3: Model details
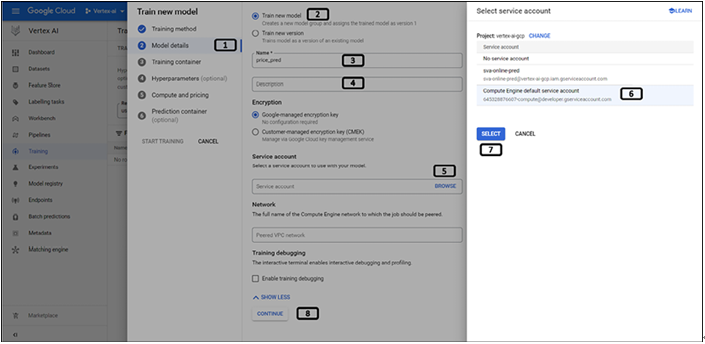
Select the model details to train the model as shown in Figure 4.28:

Figure 4.28: Model details for custom model
- After training method selection, we have to enter the Model details.
- Select Train new model.
- Provide Name for the model.
- Provide the Model description.
- Service account must be chosen for the model training. Click BROWSE.
- Since code will be pushed the Google cloud VM instance service account is needed for accessing data from cloud storage and to store back the model to the cloud storage.
- Select service account associated with the compute (users can also choose service account which we had created in Chapter 2 but roles to access cloud storage needs to be added).
- Click SELECT.
- Click CONTINUE.
Step 4: Training container details
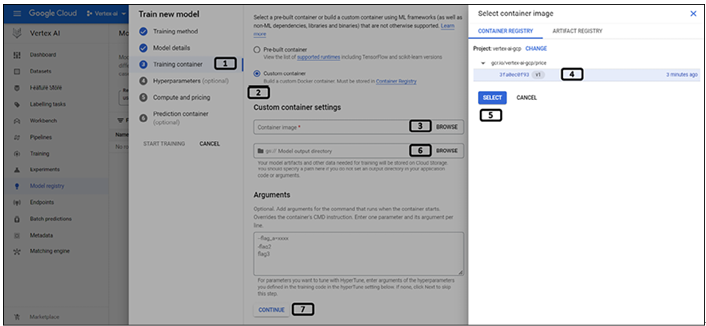
Follow the steps mentioned in Figure 4.29 to configure training container:

Figure 4.29: Container details for custom model
- After Model details selection, we have to enter the training container details.
- Select Custom container.
- Click on BROWSE to select the image created in previous section.
- Choose the image created.
- Click on SELECT.
- Select the cloud storage bucket to store model artifacts (since we have already chosen bucket in the code, this can be left bank).
- Click on CONTINUE.
Step 5: Hyperparameter tuning
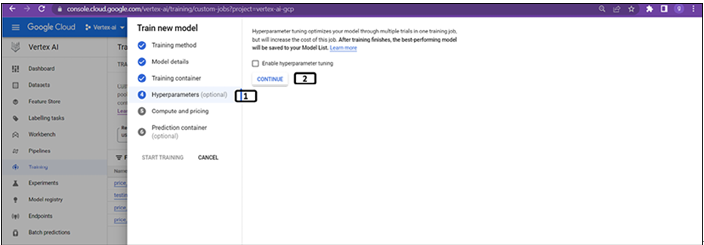
Next step is for hyperparameters. Hyperparameters will be covered in detail in the upcoming chapter. Follow the steps as shown in Figure 4.30 to skip this for now:

Figure 4.30: Hyperparameter tuning – optional
- After Training container selection, Hyperparameters an optional setting can be configured.
- Click CONTINUE (do not enable the hyperparameter tuning).
Step 6: Compute and pricing
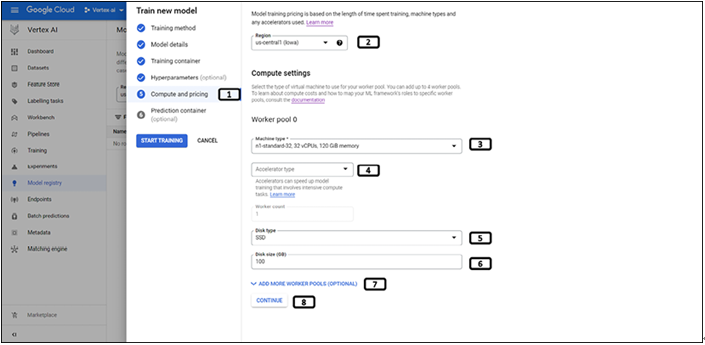
Next step is to provide compute and pricing details. Follow the steps shown in Figure 4.31 to select the machine type for training:

Figure 4.31: Compute and pricing for custom model
- Select Compute and pricing.
- Select the Region where the model training is to happen.
- Select the Machine type for the model training (choose the machine type based on how complicated your model training is).
- Acceleration type is optional and can be chosen for complex model trainings.
- Disk type can be chosen between standard and SSD.
- Disk size of the VM has to be entered.
- More Worker nodes can be added for the model training if the model is complex.
- Click CONTINUE.
Step 7: Prediction container
Last step in initiating the custom model training job is to select the Prediction container and it is optional. Follow the steps in the figure to start the model training:

Figure 4.32: Prediction container details – optional
- Select Prediction container.
- Select no prediction container (this will not deploy the model on to the end point; however, users can deploy the model later as well).
- Click on START TRAINING.
You may also like
Archives
- September 2024
- August 2024
- July 2024
- June 2024
- May 2024
- April 2024
- March 2024
- February 2024
- January 2024
- December 2023
- November 2023
- September 2023
- August 2023
- June 2023
- May 2023
- April 2023
- February 2023
- January 2023
- November 2022
- October 2022
- September 2022
- August 2022
- June 2022
- April 2022
- March 2022
- February 2022
- January 2022
- December 2021
- November 2021
- October 2021
Calendar
| M | T | W | T | F | S | S |
|---|---|---|---|---|---|---|
| 1 | 2 | |||||
| 3 | 4 | 5 | 6 | 7 | 8 | 9 |
| 10 | 11 | 12 | 13 | 14 | 15 | 16 |
| 17 | 18 | 19 | 20 | 21 | 22 | 23 |
| 24 | 25 | 26 | 27 | 28 | ||

Leave a Reply