Model deployment and predictions – Vertex AI Custom Model Hyperparameter and Deployment
Click on the imported model to see versions of the model (multiple versions of the model can be imported under the same model). In our case version 1 will be the only version of the model and it will be default as shown in the Figure 5.26 and follow the steps mentioned:
Step 1: Version selection for model deployment

Figure 5.26: Selection of model version for model deployment
Follow the corresponding steps to create endpoint and deploy the model.
- Click Deploy to endpoint.
Step 2: Endpoint creation
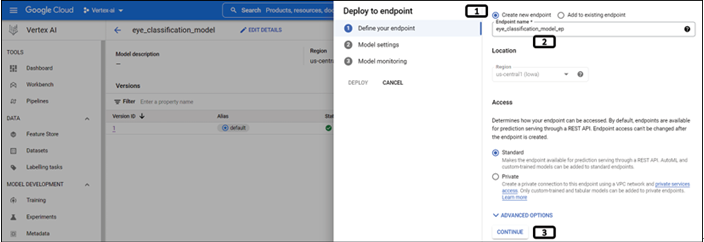
Refer the Figure 5.27 and the corresponding steps to initiate the endpoint creation:

Figure 5.27: Endpoint creation
Follow the corresponding points to create endpoint:
- Select Create new endpoint
- Provide Endpoint name
- Click on CONTINUE.
Step 3: Model settings for deployment
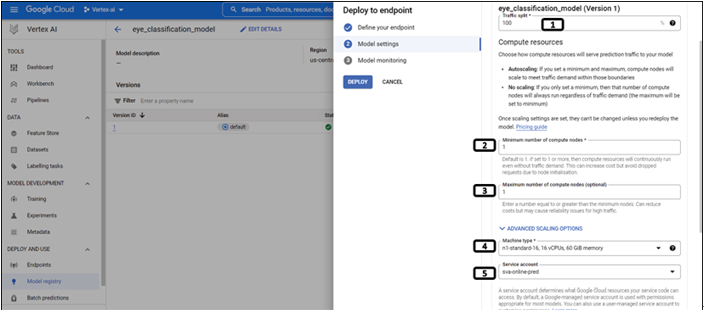
Refer the Figure 5.28 and the corresponding steps to complete the model settings:

Figure 5.28: Model settings for deployment
Follow the corresponding points to configure the model settings for deployment:
- Select the Traffic split to 100.
- Provide Minimum number of compute nodes to be 1.
- Provide Maximum number of compute nodes to be 1.
- Select the Machine type n1-standard-16 (lower configuration machine can also be selected since it is not a large model).
- Select the Service account.
- Scroll down to click CONTINUE.
Step 4: Model monitoring after deployment
Refer the Figure 5.29 and the corresponding steps to complete the monitoring settings:

Follow the corresponding points to disable the model monitoring:
- Disable the Model monitoring for the endpoint.
- Click DEPLOY.
Step 5: Status of endpoint created
Refer the Figure 5.30 to check the status of the model deployed. Status needs to be Active to obtain the predictions and endpoint ID needs to be provided in the Python code.

Figure 5.30: Model deployed to endpoint successfully
Check below mentioned points:
- Status of the endpoint needs to be Active.
- ID needs to be provided as input in Python code to obtain the predictions.
Step 6: Online predictions from Python
Model is deployed on to the GCP endpoint. Users can get the predictions from the deployed model using python on local machine. (In our example we are using PyCharm IDE to get the predictions, predictions can be obtained from any IDE or same code can be used on the workbench for the predictions).
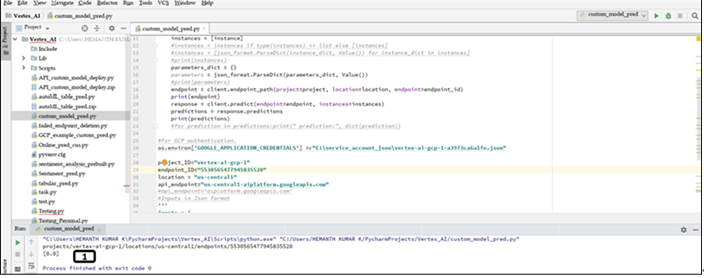
Code needs full path of service account, endpoint ID, location of the endpoint and api_endpoint to obtain the predictions. (Below code contains all the details, ensure to change the inputs as required before executing the code). Output of the code is shown in the Figure 5.31.
Install google-cloud-aiplatform Python package through the following command:
pip install google-cloud-aiplatform
More information on the package can be obtained from below link.
https://pypi.org/project/google-cloud-aiplatform/
Python Code for predictions
Install google-cloud-aiplatform
import os
from google.cloud import aiplatform
from google.protobuf import json_format
from google.protobuf.struct_pb2 import Value
Working code for hyperparameters
def online_custom_models(project,endpoint_id,instance_dict,location,api_endpoint):
client_options = {“api_endpoint”: api_endpoint}
client = aiplatform.gapic.PredictionServiceClient(client_options=client_options)
instance = json_format.ParseDict(instance_dict, Value())
instances = [instance]
parameters_dict = {}
parameters = json_format.ParseDict(parameters_dict, Value())
endpoint = client.endpoint_path(project=project, location=location, endpoint=endpoint_id)
print(endpoint)
response = client.predict(endpoint=endpoint, instances=instances)
predictions = response.predictions
print(predictions)
For GCP authentication.
os.environ[‘GOOGLE_APPLICATION_CREDENTIALS’] =r”E:\service_account_json\vertex-ai-gcp-1-a3973ca6a1fe.json”
project_ID=”vertex-ai-gcp-1”
endpoint_ID=”5530565477945835520”
location = “us-central1”
api_endpoint=”us-central1-aiplatform.googleapis.com”
Calling the function
inputs=[4287.69,3997.44,4260,4121.03,4333.33,4616.41,4088.72,4638.46, 4212.31,4226.67,4167.69,4274.36,4597.95,4350.77]
online_custom_models(project_ID,endpoint_ID,inputs,location,api_endpoint)
Output:

Figure 5.31: Prediction of the deployed model
You may also like
Archives
- September 2024
- August 2024
- July 2024
- June 2024
- May 2024
- April 2024
- March 2024
- February 2024
- January 2024
- December 2023
- November 2023
- September 2023
- August 2023
- June 2023
- May 2023
- April 2023
- February 2023
- January 2023
- November 2022
- October 2022
- September 2022
- August 2022
- June 2022
- April 2022
- March 2022
- February 2022
- January 2022
- December 2021
- November 2021
- October 2021
Calendar
| M | T | W | T | F | S | S |
|---|---|---|---|---|---|---|
| 1 | 2 | |||||
| 3 | 4 | 5 | 6 | 7 | 8 | 9 |
| 10 | 11 | 12 | 13 | 14 | 15 | 16 |
| 17 | 18 | 19 | 20 | 21 | 22 | 23 |
| 24 | 25 | 26 | 27 | 28 | ||

Leave a Reply