Pipeline code walk through – Introduction to Pipelines and Kubeflow-2
Step 6: Pipeline construction
Run the following codes to define the pipeline with the custom components and the other GCP components. Important points about the following code are:
- Decorator kfp.dsl.pipeline is used to define this function as a pipeline.
- Input for the component will be the trained model (and the artifacts) which will be collected from Input[Artifacts].
- Function fetch_eval_info will fetch the evaluation data from the trained model artifacts, which will be the passed to the metrics_log_check function to check if the model performance is above the threshold and retunes the value to be true (if the model performance is better than the threshold) or false (if other wise):
DISPLAY_NAME = ‘image_boat_classification’
@kfp.dsl.pipeline(name=”image-classification”,pipeline_root=pipeline_folder)
def pipeline(
gcs_source: str = “gs://pipeline_automl/class_labels.csv”,
display_name: str = DISPLAY_NAME,
project: str = PROJECT_ID,
gcp_region: str = “us-central1”,
api_endpoint: str = “us-central1-aiplatform.googleapis.com”,
thresholds_dict_str: str = ‘{“auPrc”: 0.60}’,
):
First component
dataset_create_op = gcc_aip.ImageDatasetCreateOp(project=project, display_name=display_name, gcs_source=gcs_source,import_schema_uri=aiplatform.schema.dataset.ioformat.image.single_label_classification)
Second component
training_op = gcc_aip.AutoMLImageTrainingJobRunOp(
project=project,
display_name=display_name,
prediction_type=”classification”,
budget_milli_node_hours=8000,
dataset=dataset_create_op.outputs[“dataset”],
)
Third component
model_eval_task = image_classification_model_eval_metrics(
project,
gcp_region,
api_endpoint,
thresholds_dict_str,
training_op.outputs[“model”],
)
with dsl.Condition( model_eval_task.outputs[“dep_decision”] == “true”, name=”deploy_decision”, ): #Fourth component is end point creation only if the condition is met endpoint_op = gcc_aip.EndpointCreateOp( project=project, location=gcp_region, display_name=”train-automl-vision”, ) #Fifth component of the pipeline is deploying model on the endpoint created. gcc_aip.ModelDeployOp( model=training_op.outputs[“model”], endpoint=endpoint_op.outputs[“endpoint”], automatic_resources_min_replica_count=1, automatic_resources_max_replica_count=1)
Step 7: Compile using kubeflow
Run the following codes to compile the pipeline code. The correct data type usage in pipelines is verified by the Kubeflow Pipelines SDK v2 compiler, as is the avoidance of inputs from parameters being used as outputs from artifacts and vice versa:
compiler.Compiler().compile(pipeline_func=pipeline, package_path=”image_classif_pipeline.json”)
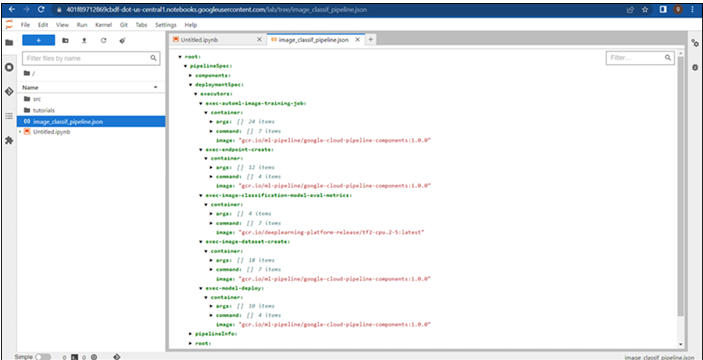
Once the code is executed, JSON file named as image_classif_pipeline will be created as shown in Figure 6.10:

Figure 6.10: JSON file created for the custom model evaluation component
- Open the JSON file:

Figure 6.11: JSON file contents
JSON will have all the details regarding components of the pipeline, parameters of each component, run time configuration, parameters, and so on.
Except the model evaluation component, all other components will be executed on the ML-pipeline component. Only the model evaluation component will be executed on the deep-learning packages (which is mentioned in the code).
Step 8: Pipeline creation
Run the following code to create the pipeline:
ml_pipeline_job = aiplatform.PipelineJob(
display_name=”automl-image-training”,
template_path=”image_classif_pipeline.json”,
pipeline_root=pipeline_folder,
parameter_values={“project”: PROJECT_ID, “display_name”: DISPLAY_NAME},
enable_caching=True
Step 9: Submitting the Pipeline job
Run the following code to submit the pipeline job. The link will be provided once the code is executed for the pipeline as shown in Figure 6.12:
ml_pipeline_job.submit()

Figure 6.12: Pipeline link in the notebook file
- Once the pipeline’ job is submitted, a link will be provided to check the status of the pipeline. Click on it.
You may also like
Archives
- September 2024
- August 2024
- July 2024
- June 2024
- May 2024
- April 2024
- March 2024
- February 2024
- January 2024
- December 2023
- November 2023
- September 2023
- August 2023
- June 2023
- May 2023
- April 2023
- February 2023
- January 2023
- November 2022
- October 2022
- September 2022
- August 2022
- June 2022
- April 2022
- March 2022
- February 2022
- January 2022
- December 2021
- November 2021
- October 2021
Calendar
| M | T | W | T | F | S | S |
|---|---|---|---|---|---|---|
| 1 | 2 | |||||
| 3 | 4 | 5 | 6 | 7 | 8 | 9 |
| 10 | 11 | 12 | 13 | 14 | 15 | 16 |
| 17 | 18 | 19 | 20 | 21 | 22 | 23 |
| 24 | 25 | 26 | 27 | 28 | ||

Leave a Reply