Pipeline code walk through – Pipelines using Kubeflow for Custom Models
We will be using Python 3 notebook file to type commands, create a pipeline, compile and to run it. Follow the following mentioned steps to create a Python file and type the Python codes given in this section.
Step 1: Create Python notebook file
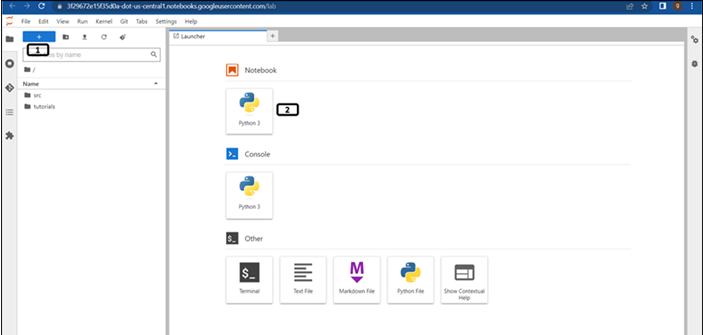
Once the workbench is created, open the Jupyterlab and follow the steps mentioned in Figure 7.8 to create Python notebook file:

Figure 7.8: New launcher window
- Click New launcher.
- Double click the Python 3 notebook file to create one.
Step 2 onwards, run the given codes in separate cells.
Step 2: Package installation
Run the following commands to install the Kubeflow, google cloud pipeline and google cloud aiplatform package. (It will take few minutes to install the packages): USER_FLAG = “–user”
Step 3: Kernel restart
Type the following commands in the next cell, to restart the kernel. (Users can restart kernel from the GUI as well): import os
Step 4: Enabling APIs
Run the following mentioned lines of code to enable the APIs. We used to enable APIs from cloud shell. This is another way of enabling the APIs from the Python notebook (except cloud resource manager all other APIs are enabled in previous chapters): !gcloud services enable compute.googleapis.com \
If all the APIs are enabled successfully, the success message will be printed as shown in Figure 7.9:

Figure 7.9: APIs enabled successfully
Step 5: Importing packages
Run the following lines of codes in a new cell to import the required packages: from typing import NamedTuple
Using the vertex AI pipeline, we are creating a dataset from the data available in the BigQuery, apply minimal data transformation and split the data for the training and testing purpose, train the model with the training dataset and evaluate the model performance on the testing dataset. We are saving the artifacts (or intermediate outputs) at each stage of the pipeline to cloud storage.
Step 6: Bucket for storing artifacts of the pipeline
Run the following lines of codes to set the location to store the artifacts. Bucket will be created during the pipeline run: USER_FLAG = “–user”
Step 7: First component of the pipeline (to fetch data from BigQuery)
Run the below mentioned codes to define the custom component for model evaluation and threshold comparison which will be included in the pipeline. Important points about the code are:
- Decorator component is used to define this function as a component of the pipeline.
- Input for the component will be location of the bigquery table from which data needs to be fetched:
#First Component in the pipeline to fetch data from big query.
Step 8: Second component of the pipeline (data transformation)
Run the following codes to define the second component of the pipeline. It will apply data transformation and split the data to train and test samples. Input for this component will be dataset from the previous component and the outputs will be two separate datasets.
Step 9: Third component of the pipeline (Model training)
Run the following codes to define the third component of the pipeline. It will train the model (random forest classifier) on the training dataset. Input for this component will be training dataset from the second component, and the output will be the trained model: #Third component Model training
Step 10: Fourth component of the pipeline (Model evaluation)
Run the following codes to define the fourth component of the pipeline. It will import the trained model from the third component and test dataset from the second component. Check the model performance on the test dataset and log the model metrices: #Fourth component Model evaluation
Step 11: Pipeline construction
Run the following codes to define the pipeline with the custom components:
- Decorator kfp.dsl.pipeline is used to define this function as a pipeline.
- Input for the component will be the trained model (and the artifacts) which will be collected from Input[Artifacts].
- Function fetch_eval_info will fetch the evaluation data from the trained model artifacts, which will be the passed to the metrics_log_check function to check if the model performance is above the threshold and retunes the value to be true (if the model performance is better than the threshold) or false (if other wise):
@dsl.pipeline(
Step 12: Compile using Kubeflow
Run the following codes to compile the pipeline code. The correct data type usage in pipelines is verified by the Kubeflow Pipelines SDK v2 compiler, as is the avoidance of inputs from parameters being used as outputs from artifacts and vice versa:
compiler.Compiler().compile(pipeline_func=pipeline,package_path=’employee_promotion_prediction_rf.json’)
Step 13: Pipeline creation
Run the following codes to create the pipeline:pipeline_run_rf = pipeline_jobs.PipelineJob(
Step 14: Submitting the Pipeline job
Run the following code to submit the pipeline job. Link will be provided once the code is executed for the pipeline as shown in Figure 7.10:
pipeline_run_rf.run()

Figure 7.10: Pipeline link in the notebook file
- Once the pipeline’s job is submitted, a link will be provided to check the status of the pipeline. Click on it.
You may also like
Archives
- September 2024
- August 2024
- July 2024
- June 2024
- May 2024
- April 2024
- March 2024
- February 2024
- January 2024
- December 2023
- November 2023
- September 2023
- August 2023
- June 2023
- May 2023
- April 2023
- February 2023
- January 2023
- November 2022
- October 2022
- September 2022
- August 2022
- June 2022
- April 2022
- March 2022
- February 2022
- January 2022
- December 2021
- November 2021
- October 2021
Calendar
| M | T | W | T | F | S | S |
|---|---|---|---|---|---|---|
| 1 | 2 | |||||
| 3 | 4 | 5 | 6 | 7 | 8 | 9 |
| 10 | 11 | 12 | 13 | 14 | 15 | 16 |
| 17 | 18 | 19 | 20 | 21 | 22 | 23 |
| 24 | 25 | 26 | 27 | 28 | ||

Leave a Reply